To capture real wildlife behavior with trail cameras, position them along animal trails, near water sources, or at feeding sites where animals naturally pass. Mount the camera at eye level and angle it toward activity zones to improve clarity. Conceal it with natural foliage and use scent-eliminating methods to stay hidden. Avoid obvious spots and protect your gear from weather. Want to learn how to fine-tune your setup for the best footage? Keep exploring these tips.
Key Takeaways
- Place cameras along animal trails, water sources, and natural crossing points for authentic wildlife activity footage.
- Mount cameras at animal eye level and angle slightly to avoid detection and false triggers.
- Use camouflage, concealment, and scent control to keep cameras hidden and minimize human scent interference.
- Mount in shaded, quiet areas protected from weather to extend camera lifespan and maintain footage quality.
- Regularly check and adjust camera settings based on animal movement patterns and environmental conditions.

Large Size Automatic Chicken Coop Door Solar - Powered Auto Chicken Door Opener, Timer Modes for Safe and Convenient Chicken Keeping with Intelligent Obstacle Sensors, Remote Control, 14.2"H x 10.83"L
🌞 [Efficient Solar-Powered Operation] Our automatic chicken coop door features a powerful internal lithium battery with a large...
As an affiliate, we earn on qualifying purchases.
Why Proper Placement Is Crucial for Wildlife Camera Success
Proper placement is essential if you want your wildlife camera to capture clear and useful footage. Positioning your camera correctly guarantees it stays functional over time, so regular camera maintenance becomes easier and less frequent. Consider weather considerations—placing your camera in sheltered spots protects it from rain, snow, and wind, preventing damage and false triggers. Avoid locations prone to flooding or excessive moisture, which can harm the device or cause blurry footage. Clear, stable surfaces help keep your camera steady and aligned. Also, keep the lens clean and check batteries regularly, especially if weather conditions are harsh. Proper positioning not only improves footage quality but also helps in achieving optimal color accuracy for your images. Additionally, understanding camera placement techniques can significantly increase your chances of capturing elusive wildlife behaviors. Thoughtful placement minimizes the need for frequent adjustments, maximizes footage quality, and prolongs your camera’s lifespan, making your wildlife monitoring efforts much more successful. Incorporating environmental factors into your placement strategy ensures better results and enhances the overall effectiveness of your wildlife cameras. Recognizing the importance of wildlife behavior patterns can guide you in selecting the most strategic locations for your camera setup. Paying attention to animal movement patterns can further refine your positioning strategy for more successful captures.

Chickaura Automatic Chicken Coop Door Solar Powered with Nesting Pad - Waterproof Chicken Door with Timer, HD Camera, Anti-Pinch Protection, Mobile App & Remote Control, Alarm System, Mic & Speaker
【Smart Solar-Powered Protection with HD Camera】- Upgrade your coop with an automatic coop door featuring a 1080P night-vision...
As an affiliate, we earn on qualifying purchases.
How to Choose the Best Spot Based on Animal Behavior
To find the best spot, start by tracking how animals move through your area and noting their regular paths. Pay attention to their daily routines to identify when they’re most active. Look for key spots where animals frequently gather or pass by, and position your camera there for the best results. Utilizing behavioral patterns can help you anticipate animal activity and improve your chances of capturing authentic wildlife behavior. Observing animal movement over time can reveal natural pathways and resting areas that are often overlooked. Incorporating proper placement techniques based on these patterns ensures more consistent and natural wildlife captures. Additionally, understanding the horsepower of electric dirt bikes can inspire the use of durable, lightweight equipment that withstands off-road conditions when setting up your camera spots. Recognizing the net worth of reality TV personalities can also offer insights into how professional endorsements might support your wildlife observation endeavors.
Track Animal Movement Patterns
Understanding animal movement patterns is key to selecting effective spots for your trail camera. By observing trails, bedding areas, and water sources, you can pinpoint where wildlife frequently travels. Using camera technology, you can track these movements without disturbing animals, supporting wildlife conservation efforts. A comprehensive understanding of wildlife behavior studies reveal that animals often follow specific paths and routines, which can be leveraged for more successful camera placement. To visualize common paths, consider this layout:
| Key Features | Typical Animal Activity |
|---|---|
| Game trails | Regular travel routes |
| Water sources | Drinking and cooling points |
| Bedding areas | Resting and shelter sites |
| Food sources | Foraging zones |
Focus your camera on these features to increase your chances of capturing authentic wildlife behavior. Tracking movement patterns helps you select spots where animals naturally gather, ensuring your camera records their true routines. Incorporating Free Floating techniques can also help in positioning your camera discreetly and effectively.
Observe Daily Routines
Tracking animal movement patterns gives you a snapshot of where wildlife tends to gather, but observing their daily routines reveals even more about their habits. Pay attention to how weather conditions influence their activity times—some animals prefer early mornings or late evenings when temperatures are cooler. Regularly check your trail camera to guarantee it’s functioning properly; camera maintenance is key to capturing consistent footage. Notice which spots animals visit repeatedly and at what times, as these routines help you determine the best location for future placements. By understanding their daily habits, you can position your trail camera where animals feel most comfortable and active, increasing your chances of capturing genuine wildlife behavior. Incorporating camera placement techniques and understanding animal activity patterns can further enhance your ability to observe authentic animal activities. Additionally, observing their behavioral patterns can provide deeper insights into their natural routines and social structures. Paying attention to behavioral cues can also help you anticipate animal movements and improve your placement strategy, especially when considering animal movement ecology.
Identify Key Activity Spots
Observing where animals frequently visit and spend time is crucial for selecting the best spots for your trail camera. Focus on areas like game trails, water sources, or food plots, where activity is consistent. Pay attention to their routines to identify key activity spots. Once you’ve chosen a location, ensure your camera has fresh batteries, as long battery life is essential for extended monitoring. Weather considerations also matter; avoid placing cameras in direct rain or snow, which can damage equipment or cause false triggers. Position your camera at animal eye level for clearer images, and test the view before leaving. By identifying key activity spots carefully, you increase your chances of capturing authentic wildlife behavior without interruptions. Additionally, understanding auditory processing can help you interpret animal sounds and behaviors more accurately, enhancing your overall wildlife observation experience.
Large Solar Automatic Chicken Coop Door with Timer & Light Sensor, Aluminum Poultry Door with LCD Display, Remote Control & Manual Mode, Predator-Proof Auto Open Close Door for Chickens Ducks Hens
Solar Powered & Energy-Efficient Operation: Built-in solar panel powers the automatic chicken coop door without wiring or frequent...
As an affiliate, we earn on qualifying purchases.
Where Are the Top Locations to Set Up Your Trail Camera?

You’ll get the best results by placing your trail camera along animal trails and paths where wildlife naturally moves. Water sources like ponds and streams also attract animals, making them prime spots for capturing activity. Additionally, setting up near food or bait sites can increase your chances of spotting various species. Using proper camera placement techniques can further improve your photos and videos. Incorporating eco-friendly materials in your camera setup can also appeal to environmentally conscious observers, ensuring sustainable wildlife monitoring. Understanding animal behavior patterns can help you position your camera more effectively for successful captures, and applying creative storytelling principles can enhance your documentation and sharing of wildlife encounters. Being aware of natural habitat features can further refine your placement strategies for optimal results.
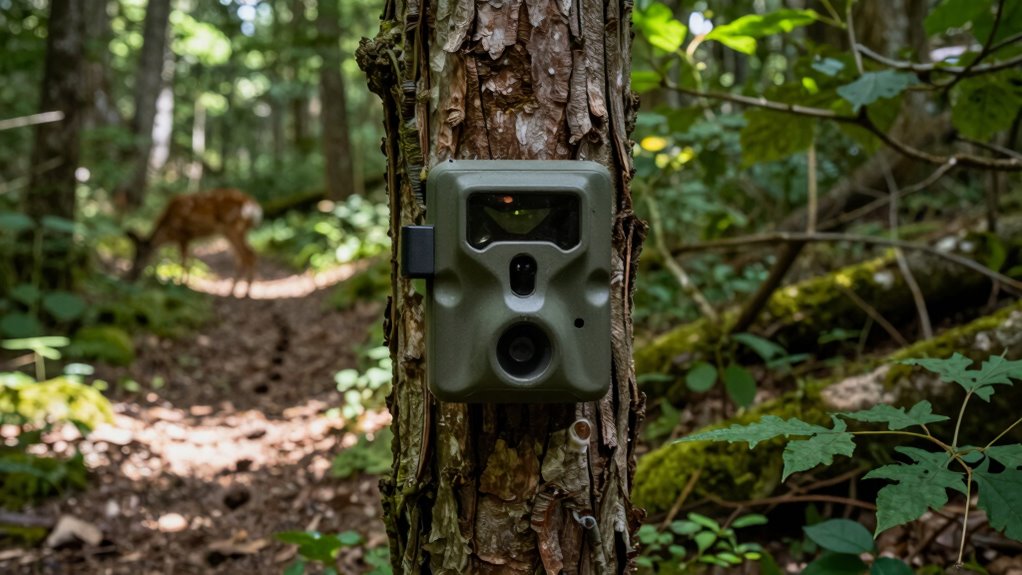
Animal Trails and Paths
Have you ever wondered where animals naturally travel or gather? Animal trails and paths are prime spots for your trail camera because they reveal authentic behavior. Look for areas where habitat diversity creates natural crossings or bottlenecks. These spots often attract animals during their nocturnal activity, increasing your chances of capturing real moments. Consider these top locations:
- Narrow passageways between thick cover and open spaces
- Natural crossings over fences or barriers
- Game trails near dense brush or bedding areas
- Trails connecting food sources to water or shelter
- Wildlife movement patterns can help identify the most active routes at different times of day.
- Monitoring these natural travel routes can maximize your chances of observing diverse species and behaviors.
Setting your camera along these paths takes advantage of animals’ natural travel routes, providing insights into their habits and the habitat diversity they seek. This method ensures you see the most genuine wildlife behavior.
Water Sources and Ponds
Ever wonder where wildlife gathers around water sources? Ponds and streams attract animals, especially during dry months. Setting your trail camera near these spots captures active moments like bird nesting and insect activity. Look for areas where animals come to drink or bathe, such as shallow edges or natural crossings. Placing your camera at different heights can reveal more behaviors. Here’s a quick guide:
| Location Type | Key Activity | Best Time |
|---|---|---|
| Pond edge | Bird nesting, drinking | Early morning, dusk |
| Stream crossing | Insect activity, foraging | Late afternoon |
| Shallow pools | Bathing, drinking | Midday |
| Water runoff areas | Wildlife gathering | Dawn and dusk |
These spots give you a clear view of wildlife behavior around water.
Food and Bait Sites
Are you wondering where to place your trail camera to get the best shots of wildlife feeding? Focus on prime food and bait sites where animals naturally gather. Proper bait placement is key—position it along well-traveled game trails or near natural cover to entice animals into view. Pay close attention to camera angles; place your camera at eye level or slightly above to capture clear, engaging shots. Here are the top locations:
- Along heavily used game trails leading to feeding areas
- Near natural mineral licks or salt blocks
- Close to feeding stations or bait piles
- At watering holes with nearby food sources

NyPots Automatic Chicken Coop Door Solar Powered, LCD Display Automatic Chicken Door with Timer & Light Sensor, Aluminum Alloy Chicken Door with Remote Control & 4 Modes
Opening Size - When the door is opened, the entrance of the door is 8.2 inches wide and...
As an affiliate, we earn on qualifying purchases.
How to Position Your Camera for Natural, Unbiased Footage
Positioning your trail camera correctly is essential for capturing natural, unbiased footage of wildlife. Place it at animal eye level and avoid obvious paths to get authentic behavior. Adjust the camera sensitivity to avoid false triggers from moving branches or changing light. Consider weather conditions; mount your camera in shaded areas to prevent glare and false triggers caused by rain or snow. Use the following to visualize your setup:
| Ideal Positioning | Environment Factors |
|---|---|
| Eye level with animals | Shield from direct sunlight |
| Slightly angled toward trails | Avoid windy branches |
| Camouflage for concealment | Protect from rain and snow |
How Can I Camouflage My Trail Camera and Minimize Human Scent?
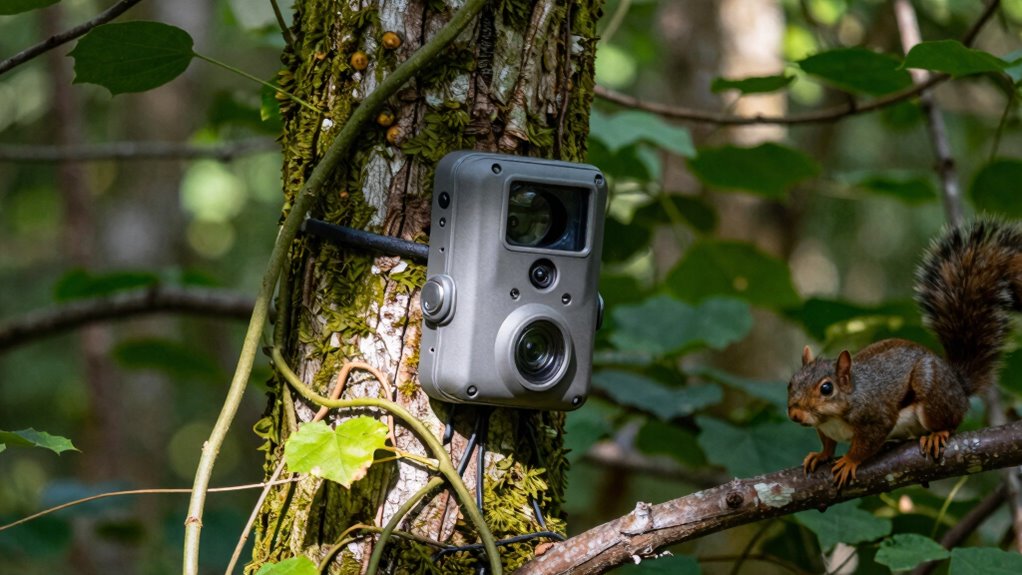
To effectively camouflage your trail camera and reduce human scent, start by choosing natural materials like leaves, branches, or dirt to blend it seamlessly into the environment. Proper camouflage techniques help the camera stay hidden, encouraging authentic wildlife behavior. To minimize human scent, handle your camera with gloves and avoid unnecessary contact, as scent can scare animals away. Here are four key tips:
- Cover the camera with natural foliage that matches its surroundings.
- Use scent-eliminating sprays or cleaners on the camera and your hands.
- Mount the camera in shaded, quiet areas to avoid drawing attention.
- Regularly check your camera without disturbing the environment to maintain scent minimization.
Implementing these tips ensures your trail camera remains undetected and captures genuine wildlife activity.
What Height and Angle Work Best for Great Shots?
Finding the right height and angle for your trail camera is essential to capturing clear, compelling wildlife shots. Proper camera angles can make the difference between a blurry, unusable photo and a striking image. Generally, setting your camera at a height of 3 to 4 feet works well for most animals, but adjust based on their size. Height adjustments help target specific species and behaviors, like foraging or crossing trails. Aim the camera slightly downward at about a 30-degree angle to reduce glare and ensure a broad view of the scene. Keep in mind that a level, steady camera position minimizes distortion. Experiment with different heights and angles to discover what captures your target wildlife best and gives you the most engaging shots.
Common Placement Mistakes and How to Avoid Them
Many common placement mistakes can reduce the effectiveness of your trail camera and lead to poor-quality photos. First, avoid placing the camera where camera blind spots exist; check from different angles to guarantee full coverage. Second, ignore weather considerations—placing the camera in low-lying areas prone to flooding or heavy snow can damage it or obscure images. Third, don’t set it too high or too low; correct height and angle are vital for capturing clear shots of wildlife. Lastly, avoid cluttered spots like dense foliage or busy trails that can confuse the sensor or produce blurry images. Being mindful of these mistakes helps you maximize your camera’s potential, making sure you get authentic wildlife behavior captured in perfect shots.
Frequently Asked Questions
How Often Should I Check My Trail Camera to Avoid Missing Wildlife Activity?
You should check your trail camera every 3 to 7 days to avoid missing wildlife activity. This camera check frequency allows you to monitor ongoing activity and guarantees you don’t miss important moments. Keep in mind, wildlife activity timing varies, so regular checks help you capture peak behavior. Adjust your schedule based on animal patterns and weather conditions, maximizing your chances of recording authentic wildlife behavior.
Can Weather Conditions Affect the Camera’s Placement and Footage Quality?
Weather impact can considerably affect your camera’s footage quality, so you should consider it when camera positioning. Harsh weather like rain, snow, or extreme temperatures can cause condensation, damage, or obscure images. To minimize this, place your camera in sheltered spots, like under overhangs or dense foliage, and make sure it’s weatherproof. Regularly check and clean the lens to keep footage clear, especially after heavy weather events.
What Lighting Considerations Are Important for Nighttime Wildlife Footage?
You might think lighting isn’t a big deal at night, but infrared illumination is your secret weapon. It provides clear footage without disturbing animals, especially during moon phase effects that can muddle natural darkness. Position your camera for ideal infrared coverage, avoiding reflective surfaces, and consider moon cycles—full moons can brighten scenes naturally. Smart lighting choices ensure you capture authentic wildlife behavior, even in complete darkness.
Are There Legal Restrictions on Where I Can Set up Trail Cameras?
Yes, there are legal restrictions on camera placement. You should check local laws and property rules before setting up your trail camera. Avoid placing cameras on private property without permission, and steer clear of areas with legal restrictions like national parks or wildlife refuges. Always respect wildlife and privacy rights, ensuring your camera placement complies with regulations to prevent fines or confiscation. Proper research helps you avoid legal issues.
How Do I Maintain Battery Life During Extended Monitoring Periods?
Think of your trail camera as a tiny energy fortress; to keep it powered, you need to optimize its resources. Use battery optimization settings and switch to solar power where possible, like giving it a daily sip of sunlight. Regularly check and swap batteries if needed, especially in low-light seasons. This way, your camera stays active longer, capturing every moment without running out of juice during extended monitoring periods.
Conclusion
By mastering these placement tricks, you’ll unveil wildlife secrets like a detective with a superpower. Your trail camera will become a wildlife whisperer, capturing jaw-dropping, never-before-seen behavior that could change everything you think you know about nature. With the right spot, perfect angle, and stealthy setup, you’ll be recording epic moments so incredible they’ll blow your mind and leave you wondering if you’ve tapped into an animal universe you never knew existed.