
To prevent pet gate hinge failures and guarantee reliable containment, start by choosing a sturdy gate with secure hinges and proper materials. Follow precise installation steps: measure carefully, use a level, and tighten screws securely without overtightening. Reinforce hinges with brackets if needed, and regularly inspect and lubricate to keep everything functioning smoothly. Proper setup and maintenance are key—continue with these tips to learn how to make your pet gate last longer and stay effective.
Key Takeaways
- Measure carefully and mark hinge positions precisely, double-checking before drilling for proper alignment.
- Use rust-resistant, appropriate hardware and anchors suitable for your wall or door surface.
- Ensure hinges are aligned correctly to allow smooth swinging without gaps or stress.
- Regularly tighten screws, lubricate hinges, and inspect for rust or damage to prevent failure.
- Reinforce hinges with metal brackets or braces for added stability and long-term durability.

Cumbor 29.2–43" Baby Gate for Stairs, Hardware Mounted (Drill Required), Expandable No Bottom Bar Dog Gate, Auto Close Extra Wide Walk Thru, Pet & Toddler Proof Gate, Top & Bottom of Stairways(Black)
【Hardware Mounted for Maximum Safety – Strongest Protection for Stairs】This gate must be hardware mounted with drilling (not…
As an affiliate, we earn on qualifying purchases.
As an affiliate, we earn on qualifying purchases.
How to Choose the Best Pet Gate for Your Home and Pet

Choosing the right pet gate starts with evaluating your home’s layout and your pet’s behavior. Consider where you’ll place the gate and how much space your pet needs to move freely. If your dog loves to chew or climb, look for a sturdy gate with secure hinges and durable materials. Incorporate pet training by directing your dog to see the gate as a positive boundary, maybe with treats or dog toys nearby. Choose a gate that fits your doorways or stairwells without obstructing daily activities. Think about how often you’ll need to remove or adjust the gate, and opt for one that’s easy to install and clean. Proper selection helps prevent hinge failures and keeps your pet safely contained. Understanding existential themes can also help in addressing behavioral challenges during training. Additionally, selecting a gate with secure hinges and durable materials enhances its longevity and effectiveness. Considering sound therapy techniques might also reduce anxiety or stress related to confinement, making the experience more comfortable for your pet. Incorporating visual barriers can also help calm anxious animals and improve their overall containment experience, especially if the barrier is made from appropriate materials that prevent escape attempts.

Vmaisi 4 Pack 8MM Baby Gate Threaded Spindle Rod, Replacement Hardware Parts Kit for Pet & Dog Pressure Mounted Safety Gates – Extra Long Wall Mounting Accessories Screws Rods Adapter Bolts Black
4 Pack 8MM Baby Gate Threaded Spindle Rod, Extra Longer 12CM (4.8 Inches) Replacement Hardware Parts Kit for…
As an affiliate, we earn on qualifying purchases.
As an affiliate, we earn on qualifying purchases.
Common Causes of Pet Gate Hinge Failures and How to Spot Them

Hinge failures in pet gates often happen when certain common issues go unnoticed. One major culprit is hinge rust, which weakens metal over time and can cause the hinge to seize or break. Regularly inspect your hinges for rust buildup, especially if you live in a humid environment. Rust not only compromises the hinge’s integrity but also accelerates wear and tear, making early detection crucial. Another common cause is hinge misalignment, which occurs when the gate isn’t properly installed or shifts with use. Misaligned hinges put extra stress on the joints, increasing the risk of failure. To spot these problems early, check for rust spots, corrosion, or stiffness around the hinges. Also, observe if the gate swings unevenly or sticks when opening or closing. Proper installation techniques are essential to prevent misalignment and ensure durability. Addressing rust and correcting misalignment promptly can considerably prolong your pet gate’s lifespan and ensure safe containment. Additionally, understanding proper installation techniques can help you make informed decisions about securing your investments for the future. Recognizing signs of hardware wear can prevent unexpected gate malfunctions before they compromise safety. Performing regular preventative maintenance can further extend the life of your pet gate and keep it functioning reliably.

Cideny Baby Gate No Drilling, 29"-40" Auto Close Dog Gate Indoor for Doorways & Stairs, Pressure Mounted Adjustable Pet Gate, Easy Walk Through Child Gate for Children & Pets Stroller Friendly, White
Auto-Close Baby Gate: Designed with an intelligent self-closing system, this dog gate automatically swings shut at angle under…
As an affiliate, we earn on qualifying purchases.
As an affiliate, we earn on qualifying purchases.
How to Prepare Your Space and Gather Tools Before Installation

Before installing your pet gate, it’s important to prepare the space and gather all necessary tools to make certain a smooth setup. Clear the area of any clutter or hazards that could interfere with installation or pose a risk to your pet. Use furniture covers to protect your furniture from scratches or accidental damage during setup. Consider applying pet proof paint to nearby surfaces if you want to prevent your pet from chewing or marking those areas. Gather essential tools such as a drill, level, measuring tape, screws, and anchors. Having everything ready saves time and reduces frustration. Ensuring the space is prepped and tools are on hand sets a solid foundation for a secure, long-lasting pet gate installation. Additionally, familiarizing yourself with mounting techniques can help ensure your gate remains secure and effective over time. Incorporating smart home automation features, like sensors or automatic locks, can further enhance your pet’s safety and containment. Researching safe materials for gates can also prevent potential injuries or damage. It’s also beneficial to review installation instructions carefully to avoid common mistakes during setup. Being aware of quality assessment tips can help you select a durable and reliable gate for your needs.

KuuDack Dog Gate Support Feet, 6 Pack Plastic Triangle Stabilizer for Freestanding Pet Gates, Fence Panel Reinforcement Fittings for Configurable Dog & Baby Gates (Black)
【Durable & Pet-Safe Material】 Made of premium PP plastic, these dog gate support feet are lightweight, odorless, and…
As an affiliate, we earn on qualifying purchases.
As an affiliate, we earn on qualifying purchases.
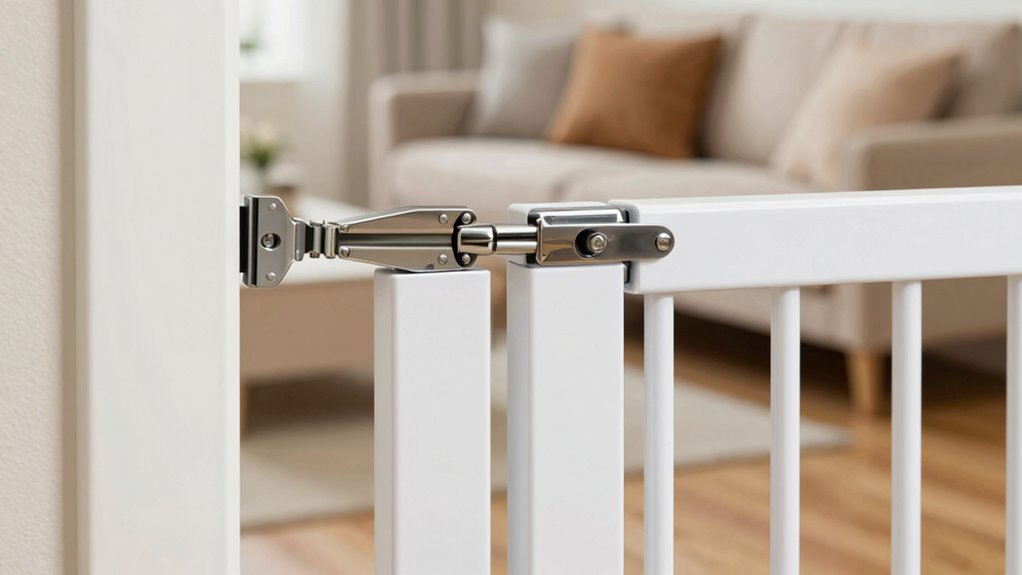
Step-by-Step: Installing Your Pet Gate at the Hinges

To install your pet gate at the hinges, start by measuring carefully to guarantee a perfect fit. Use a level and measuring tape for accurate placement, preventing future stability issues. Then, secure the hinges firmly with the right mounting hardware to keep your gate stable and safe. Incorporating protective styling benefits by choosing durable hardware can also help ensure your gate withstands daily use. Additionally, selecting hardware that is resistant to rust and corrosion adds an extra layer of hardware durability, ensuring long-term functionality and safety. For optimal performance, consider using hardware designed with European cloud innovations, which often feature enhanced corrosion resistance and environmental sustainability. Incorporating connected technology into your hardware selection can further improve the longevity and maintenance of your pet gate over time. Proper installation techniques and quality hardware are essential for installation security and peace of mind.
Precise Measurement Techniques
Achieving a secure pet gate installation begins with precise measurements, especially at the hinges. Start by measuring the width of the doorway or opening, ensuring you account for any decorative accents that might affect clearance. Use a tape measure for accuracy, noting both width and height. When selecting pet gate colors, keep in mind that some shades may influence visibility or aesthetic harmony with your decor. Mark the hinge positions carefully, double-checking measurements before drilling. Remember, slight inaccuracies can compromise gate stability, so take your time. Confirm that the hinges align perfectly with your markings and that the gate will swing freely without catching on decorative accents. Accurate measurement techniques are essential for a proper fit, preventing future issues at the hinges. Additionally, understanding the importance of precise measurement techniques can help ensure your pet gate functions safely and effectively over time. Paying close attention to measurement accuracy can also help avoid the need for adjustments or reinstallation later, which underscores the value of detailed planning before beginning the installation. Incorporating environmental considerations such as proper site selection can further enhance the longevity and safety of your pet gate installation.
Secure Mounting Strategies
Installing your pet gate securely at the hinges requires careful mounting techniques to guarantee stability. Properly securing hinges enhances pet safety and maintains gate aesthetics. Follow these steps:
- Choose the correct hardware, such as heavy-duty screws or anchors, suited to your wall type.
- Ensure the hinges are aligned precisely to prevent gaps that compromise containment.
- Use a level to keep the gate straight, maintaining both safety and visual appeal.
- Tighten all fasteners firmly, but avoid over-tightening, which can damage the gate or wall.
How to Reinforce Hinges for Better Stability and Durability
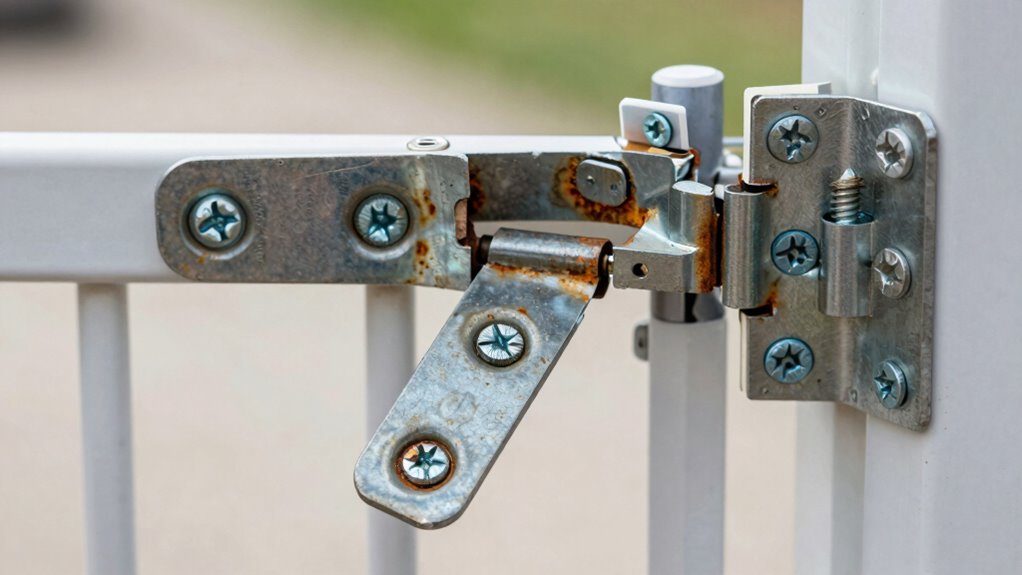
Hinges are often the weakest point in pet gates, but you can improve their stability and durability by reinforcing them properly. Start by regularly applying hinge lubrication to prevent squeaking and reduce wear, which keeps hinges functioning smoothly longer. If you notice hinges are loose or corroded, consider hinge replacement to restore strength and alignment. Reinforcing hinges also involves tightening screws and using longer or thicker fasteners if possible, ensuring a secure fit. Adding a metal brace or corner brackets can distribute weight more evenly and prevent sagging. These small upgrades make a big difference, helping your gate stay stable under pressure and increasing its lifespan. Proper hinge maintenance and reinforcement are essential for reliable pet containment. Understanding load calculations can help you determine the best reinforcements to withstand daily use and prevent failure.
Common Mistakes That Weaken Pet Gate Hinges and How to Avoid Them

Many pet gate failures come from simple mistakes like improper mounting, overloading the gate, or choosing weak hinge materials. These errors weaken hinges and compromise stability. To keep your gate secure, avoid these pitfalls and select strong, appropriate hinges for your setup.
Incorrect Mounting Techniques
Incorrect mounting techniques are a common culprit behind weak pet gate hinges. Poor hinge alignment can cause unnecessary strain, leading to early failure. Additionally, choosing an unsuitable mounting surface weakens the entire setup. To guarantee proper installation:
- Verify hinge alignment before drilling to prevent uneven stress.
- Mount hinges on a sturdy, solid surface like wood or drywall, avoiding flimsy materials.
- Use appropriate anchors and screws suited for your mounting surface.
- Avoid over-tightening screws, which can warp hinges or damage the surface.
Overloading Gates Too Much
Overloading your pet gate is a common mistake that can quickly weaken its hinges and compromise its stability. When you place too much weight or pressure on the gate, it strains the hinge materials, causing them to wear out faster. To prevent this, consider gate reinforcement options like adding extra support or securing the hinges more firmly. Avoid relying solely on lightweight hinge materials that aren’t designed to handle heavy stress. Instead, opt for sturdy, durable hinge materials suited for your pet’s size and activity level. Regularly check for signs of strain or damage, and don’t push the gate beyond its weight limit. Proper reinforcement and mindful use keep your pet gate functional and ensure it maintains its integrity over time.
Choosing Weak Hinge Materials
Choosing the right hinge materials is essential to guarantee your pet gate stays sturdy over time. Poor material selection can drastically reduce hinge durability, leading to failures. To avoid this, consider these key points:
- Use high-quality metals like stainless steel or brass for strength and corrosion resistance.
- Avoid weak plastics that can crack or warp under pressure.
- Ensure hinges are thick enough to support your gate’s weight without bending.
- Select hinges with a solid construction, avoiding those with flimsy joints or poor welds.
How to Test and Adjust Your Pet Gate for a Secure Fit

To guarantee your pet gate provides a secure barrier, it’s important to test its fit and make necessary adjustments. Begin with gate hinge testing by gently pushing or pulling the gate to see if it wiggles or shifts. Check whether the gate sits snugly against the wall or doorway without gaps. If it feels loose, perform fit adjustment by tightening the hinge screws or brackets. Ensure the hinges are aligned properly and secure, but avoid overtightening, which can cause stress on the material. Also, verify the latch mechanism works smoothly and stays in place. Regularly testing and adjusting your pet gate ensures it remains secure over time, preventing escapes or accidental falls. Proper fit and hinge integrity are key to reliable containment.
Troubleshooting: Fixing Common Hinge Problems

If your pet gate’s hinges aren’t holding up as they should, it’s time to troubleshoot common problems. First, check hinge alignment; misaligned hinges cause instability. Adjust the hinges so they sit flush and operate smoothly. Second, inspect for rust or debris; clean hinges thoroughly and consider hinge lubrication with a light oil to improve movement. Third, tighten loose screws or bolts to ensure the hinges stay secure. Fourth, if hinges are bent or damaged, replace them to restore proper function. Proper hinge lubrication prevents squeaking and sticking, while correct hinge alignment ensures the gate opens and closes seamlessly. Taking these steps will keep your pet gate functioning reliably and prevent failure at the hinge.
Tips to Maintain and Extend the Life of Your Pet Gate Hinges

Regular maintenance is key to keeping your pet gate hinges in top condition. To optimize gate hinge maintenance, regularly inspect hinges for dirt, debris, or rust, and clean them with a damp cloth. Applying a light lubricant like WD-40 or silicone spray can reduce friction, preventing squeaks and wear. Tighten loose screws or bolts promptly to avoid unnecessary strain on the hinges, which can shorten their hinge lifespan extension. Avoid harsh chemicals that may corrode metal parts, and ensure your hinges move smoothly without resistance. By routinely checking and caring for your hinges, you prolong their durability and functionality. Consistent hinge maintenance not only keeps your pet gate operating smoothly but also substantially extends the overall hinge lifespan, saving you money and effort in the long run.
When to Consider Upgrading or Replacing Your Pet Gate

Even with proper maintenance, pet gate hinges will eventually wear out or become less effective. When this happens, it’s time to think about upgrading or replacing your pet gate. Signs include compromised safety, such as loose hinges or difficulty securing the gate, affecting your pet’s containment. Additionally, if your current gate no longer matches your home’s decor, exploring new pet gate aesthetics and color options can refresh your space.
Even with proper care, pet gate hinges wear out—consider upgrading for safety and style.
Consider replacing your gate if:
- Hinges are visibly damaged or rusted.
- The gate wobbles or doesn’t latch properly.
- It no longer complements your home’s style.
- You want to upgrade to a more stylish or durable design.
Frequently Asked Questions
Can Pet Gate Hinges Be Repaired After Failure?
Yes, pet gate hinges can be repaired after failure. First, try hinge lubrication to see if it restores smooth operation. If that doesn’t work, hinge replacement is your best option. Carefully remove the damaged hinge, purchase a compatible replacement, and install it securely. Regular maintenance, like lubrication, can prevent future failures and keep your pet gate functioning properly, ensuring your pet stays safely contained.
What Signs Indicate Hinge Failure Before Complete Breakage?
Your pet gate hinge giving a tiny squeak or feeling loose is a clear warning sign of failure. Before it breaks completely, you’ll notice uneven hinge alignment, making the gate wobble or not close properly. Regular hinge lubrication can prevent this, and checking alignment helps spot problems early. Don’t wait for a break—stay vigilant with these signs to keep your pet safely contained.
Are There Safety Concerns With DIY Hinge Reinforcement?
Yes, there are safety concerns with DIY hinge reinforcement if you don’t use the right hinge material or follow safety standards. Using incompatible or weak materials can cause hinges to fail unexpectedly, risking injury or escape for your pet. To guarantee safety, choose durable, pet-proof hinge materials and adhere to established safety standards during installation. Proper reinforcement helps maintain gate integrity and keeps your pet securely contained.
How Often Should Hinges Be Inspected for Wear and Tear?
You should inspect hinges every 3 to 6 months, as studies show wear can reduce gate safety by up to 30%. During inspections, check hinge alignment and look for signs of rust or looseness. Regular hinge lubrication helps prevent squeaking and ensures smooth operation, while adjusting hinge alignment maintains gate stability. By staying proactive, you keep your pet safely contained and extend the life of your gate.
Do Different Gate Materials Affect Hinge Durability?
Yes, your gate material influences hinge strength and durability. Metal gates, like steel or aluminum, usually offer stronger hinges that withstand wear better over time. Wooden gates may have less durable hinges if not properly treated or reinforced. Plastic or lightweight materials might require more frequent hinge inspections, as their hinges can weaken faster. Choosing the right gate material guarantees better hinge longevity and keeps your pet safely contained.
Conclusion
By properly installing and reinforcing your pet gate hinges, you guarantee your furry friend stays safe and contained. For example, Sarah’s stubborn Labrador kept pushing through her old gate’s weak hinges, but after following these tips, she reinforced them and saw no more escapes. Regular maintenance and adjustments keep your gate functioning smoothly. With a little effort, you can prevent failures and create a secure space that lasts for years to come.