
TL;DR
Placing your rig in another room is the most effective way to cut noise. When in a closet, proper ventilation, strategic placement of panels, and sealing gaps make all the difference. Covering 20-40% of reflective surfaces with targeted treatment yields great results without overdoing it.
Ever wonder why some closet setups sound surprisingly good, while others turn into echo chambers? The secret isn’t just in buying more foam—it’s about where and how you treat the space. When it comes to a noisy rig or a small recording nook, your best move might be to simply put it in another room. But if that’s not an option, clever placement, ventilation, and targeted dampening are your best friends.
This guide will show you how to make your closet into a quiet, effective workspace—without turning it into a sauna or a soundproof bunker. Whether you’re recording vocals, running inference models, or just trying to keep the noise down, I’ll walk you through proven tricks and real-world examples to make it all work.
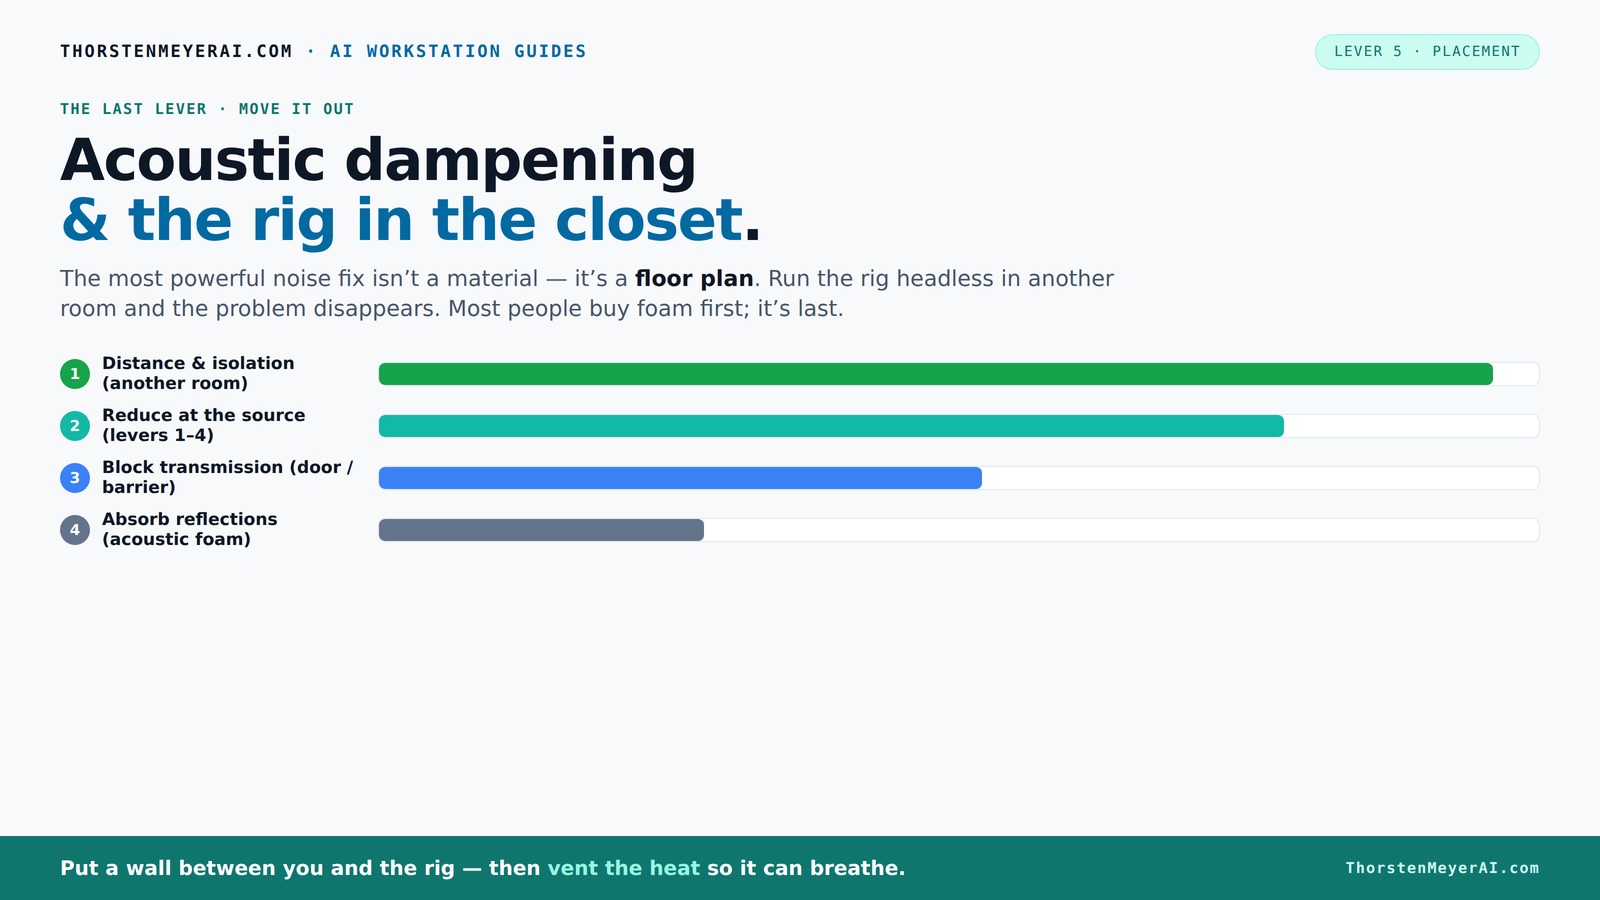
Acoustic dampening
& the rig in the closet.
The most powerful noise fix isn’t a material — it’s a floor plan. A rig you can’t hear because it’s in another room beats any amount of foam. Tap the approaches in Part 1 to see what actually works.
(another room)
(levers 1–4)
(door / barrier)
(acoustic foam)
Contain the noise, not the heat
Key Takeaways
- Moving your rig to another room is the easiest, most effective noise solution.
- Target reflection points—walls, ceiling, behind monitors—for maximum acoustic improvement.
- Cover 20-40% of reflective surfaces in a closet for good noise control without deadening the space. For more tips on pet-friendly spaces, see this pet care resource.
- Use bass traps in the corners to tame low-frequency booms in small rooms. Learn more about effective room treatment at this pet-focused site.
- Seal all gaps and cracks to prevent sound from leaking and disturbing others.

Focusound 52 Pack Acoustic Foam Panels 1" x 12" x 12" Sound Proof Foam Panles Soundproofing Noise Cancelling Wedge Panels for Home Office Recoding Studio with 300PCS Double-Side Adhesive
- Soundproofing Design: Triangular grooves for noise absorption
- Includes Adhesive Tape: 300pcs double-sided adhesive for easy installation
- Easy Shape Recovery: Reforms after soaking and air drying
As an affiliate, we earn on qualifying purchases.
As an affiliate, we earn on qualifying purchases.
Why Moving the Rig Out of Your Space Is the #1 Power Move
The simplest way to silence your rig? Put it in another room. Sound is easier to manage when it’s far away. Think of your workspace as a silent harbor while your noisy GPU roars in the closet. You connect over a fast network, and suddenly, your workspace is peaceful.
This approach works because sound diminishes over distance—by the time it reaches your ears, it’s much quieter. Plus, it frees you from the headache of sealing doors or applying foam. Just run a cable, breathe, and focus on what you’re doing.
For example, a friend installed his inference rig in the basement. Now, he SSHs into it, and the noise never hits his main workspace. The difference is night and day.
The 'Rig in the Closet' Setup: How to Keep It Cool and Quiet
Putting a powerful machine in a closet sounds perfect—until heat builds up. A sealed space traps hot air, causing temperature spikes that throttle performance and ramp up noise. The key is to make sure your closet can breathe.
Use active ventilation—like a quiet exhaust fan—and avoid sealing cracks completely. For instance, an AI researcher installed a small vent with a fan in his closet. It kept the temps stable and the noise low, even during long training runs. If you're interested in more about managing noise and heat, check out this guide on cooling and noise.
Serious setups often include ducted airflow, soundproof panels, and thermostatic control. This hybrid approach balances noise suppression with cooling efficiency. If you want expert solutions, check out this guide on cooling and noise.
Where to Place Acoustic Panels for Maximum Reflection Control
Acoustic dampening isn’t about covering every wall—it’s about targeting reflection points. The first step? Find where sound bounces back at you. The classic mirror trick works great: sit in your chair, hold a mirror against the wall, and see where the speakers' light reflects.
Place panels at these points—side walls, ceiling above your head, and behind your mic or monitors. This absorbs troublesome echoes, making your voice clearer and your recordings crisper.
Understanding why this works is crucial: sound reflections cause comb filtering, echo, and muddiness, which degrade audio clarity. By strategically placing panels at these reflection points, you disrupt the path of these reflections, reducing reverberation and improving intelligibility. This targeted approach maximizes the effectiveness of your treatment, often with fewer panels, saving cost and space. For more on acoustic treatment, see this guide on acoustic dampening.
Small Space, Big Impact: How Much Acoustic Treatment Do You Need?
In a tiny closet, less is often more. Covering every surface can make the space sound dead or boxy, which isn't desirable for most uses. Instead, target about 20-40% of the reflection points with panels. Focus on walls directly opposite and adjacent to your mic and speakers. This focused treatment reduces echoes and flutter echoes that cause muddiness, without overly damping your space and making it feel unnatural.
For instance, a home studio setup used four panels on the side walls and a bass trap in each corner. This strategic placement balanced absorption and space preservation, resulting in clearer vocals and less room noise. Remember, the goal isn’t to eliminate all sound but to control problematic reflections and low-frequency buildup that can muddy your recordings. Over-treating can lead to a lifeless sound, so understanding the tradeoffs between absorption and liveliness is key. Some experts suggest near-total wall coverage for isolation, but for a closet, *targeted treatment* often yields the best balance between sound quality and practicality.
Handling Low Frequencies: Do You Need Bass Traps in a Closet?
Low-frequency issues are common in small rooms. Standing waves and bass buildup create boomy, muddy sounds that obscure clarity. The fix? Bass traps in the upper corners of your closet can absorb these deep tones and smooth out the sound, preventing low-end resonances from dominating your recordings.
For example, a musician placed thick foam bass traps in each ceiling corner of his closet booth. This significantly reduced low-frequency resonances, resulting in tighter, more controlled vocals and instrument recordings. Bass traps work by absorbing wavelengths that are as long as the room dimensions, preventing standing waves that cause peaks and nulls. While regular panels help with mid and high frequencies, bass traps specifically target the problematic low end—crucial for achieving balanced, professional-sounding recordings in tight spaces. If your room sounds boomy or hollow, installing bass traps is often the most effective first step to improve clarity throughout the entire frequency spectrum.
Sealing Cracks and Gaps: Keep Sound From Sneaking Out
Sound leaks through cracks, gaps, and unsealed doors. In a closet setup, even small openings can significantly undermine your effort to contain noise. Use weatherstripping, acoustic sealant, or draft stoppers to block these escape routes. Sealing these gaps reduces sound transmission by at least 50%, making your space more contained and less disruptive to others.
For example, sealing the closet door with weatherstripping reduced noise bleed into the bedroom significantly, making late-night recording possible without disturbing others. Pay special attention to outlets, vents, and seams—these are often overlooked but are critical in maintaining a tight seal. Applying acoustic caulk around edges and using draft stoppers at the bottom of doors can vastly improve containment. This simple step can be the difference between a noisy, distracting setup and a discreet, professional-sounding environment.
Ventilation and Heat: How to Keep Your Closet Cool Without Noise
Good airflow is non-negotiable. Without it, your rig overheats, throttles, and increases noise levels. Use quiet exhaust fans, ducted airflow, or thermostatic vent systems. The goal is to move hot air out efficiently while minimizing noise pollution. External radiators or liquid cooling can also help export heat more effectively, reducing the need for noisy fans. Proper ventilation not only preserves your hardware’s longevity but also maintains a stable environment for consistent performance. Incorporating adjustable vents and thermostats allows you to fine-tune airflow, avoiding overcooling or excessive noise. Think of it as creating a balanced ecosystem where heat is managed proactively, preventing thermal throttling and noise spikes that can ruin your setup.
For example, a YouTuber built a custom duct with a silent fan and a thermostat. His rig stays cool, and the noise level stays low, even during hours of intense training. Exploring options like liquid cooling or external radiators can further export heat more efficiently, making your closet setup more sustainable and less noisy. Proper ventilation is the backbone of a successful, quiet, and reliable closet rig, ensuring your equipment runs smoothly without disturbing your peace or others nearby.
Frequently Asked Questions
How much of my closet walls should I treat for effective soundproofing?
Treating about 20-40% of your closet walls at reflection points is usually enough to reduce echo and improve sound quality without overloading the space. Focus on the walls directly facing your microphone and monitors.Do I really need bass traps in a small closet setup?
Yes. Bass traps in the upper corners help control low-frequency buildup that makes vocals or instruments sound muddy. They're especially important if your room has a boomy or hollow sound.What’s the best way to ventilate a closet rig without noise?
Use quiet exhaust fans, ducted airflow, or thermostatic vent systems. Make sure hot air has a clear path out while keeping noise levels low. External radiators or liquid cooling can also help export heat more effectively.Can I make a closet into a good recording space without tearing down walls?
Absolutely. Focus on strategic placement of panels, sealing gaps, and adding bass traps. Small, targeted improvements often make a huge difference—without major construction.Is acoustic dampening the same as soundproofing?
No. Acoustic dampening reduces echoes and reflections inside a space, making it sound better. Soundproofing blocks sound from leaking in or out. They serve different purposes but work best together.Conclusion
The best way to tame a noisy rig isn’t just more foam or heavier doors—it’s smart placement and thoughtful treatment. Putting your machine in another room often solves most of the problem with minimal fuss. When that’s not possible, clever acoustic design, sealing, and ventilation turn a cramped closet into a surprisingly good studio or inference space.
In the end, your goal is simple: create a space where sound stays in, heat stays out, and you stay productive. Think of your closet as a tiny fortress—built with the right materials, it can keep noise and heat locked out, so you can focus on what matters most.